When I first heard about “Blinky Bugs,” I thought they’d make a perfect craft project for my twin girls’ sixth birthday party. Then I took a closer look at the complexity and delicacy of the assembly and realized it was beyond the skill level I could expect of my girls and their five to six year old friends.
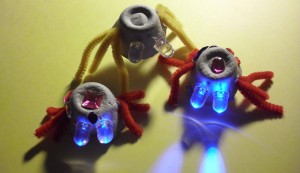
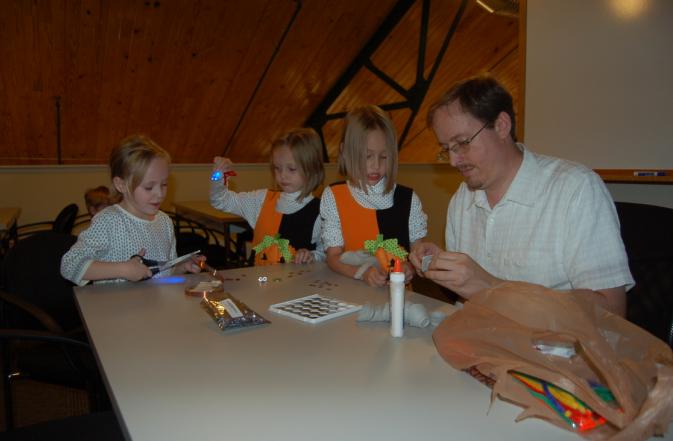
So I set out to design a more simple and easier-to-build version of the Blinky Bug. I call them “LED Bugs.” This post describes their construction, provides a parts list along with links to order parts, and describes the experience of guiding a dozen five- and six-year-olds through the construction process in less than 45 minutes.

First, here’s the parts list. My friend and co-worker, Justin Richards (of Makers’ Local 256), kindly donated a batch of CR2430 batteries. This is the expensive aspect of the design, with new batteries running $3-$5 each. CR2430’s have a nominal capacity of 280mA-hr and can tolerate a 6mA continuous discharge current (see data sheet). Just about any available 3V coin cell battery would probably work. I also found a good source for high intensity 10mm LEDs on Amazon in 50 packs for $16.95. I used blue LEDs, but green, red, or white are also available. These LEDs are very directive, making them a good choice for a flashlight type project as well. A roll of copper foil tape came in handy. The key electronics parts are summarized below along with links to order them from Amazon:
- CR2430 3V Lithium [$3.89]
- 10mm LED Bulb- Blue (50 Pack) [$16.95]
- 10mm LED Bulb- Green (50 Pack) [$16.95]
- 10mm LED Bulb- Red (50 Pack) [$16.95]
- 10mm LED Bulb- White (50 Pack) [$16.95]
- Copper Foil Shielding Tape, 2.6 MIL x 3/8 [$15.50]
The project requires a soldering iron and solder, as well as an egg carton (for the bugs’ bodies) and scissors. Needle-nose plyers come in handy for holding the pieces while soldering. Colored pipe cleaners for legs and acrylic “jewels” for decoration completed the parts.

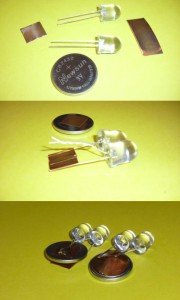
The first step of the construction is to place a short piece of copper foil tape on the “+” side of the battery to enable a good solder connection. Then connect the LEDs in parallel. Lay the two LED’s side-by-side and twist the LONGER of the leads together. Take the longer piece of copper foil and connect the longer two of the LED leads together so as to make a square contact. This will be the switch to activate the LED bug. Confirm that the LEDs are correctly assembled by connecting the twisted leads to the copper foil taped positive side of the battery and the copper contact side to the negative terminal. The LEDs should light. If they don’t, flip the battery to see if they light. Once you are confident the LEDs are arranged with the correct polarity, carefully solder the twisted legs to the copper tape. I used the copper tape because I had trouble getting the solder to adhere to the bare battery even using a considerable amount of flux.
Given the limited time and number of children, I did all the soldering myself. If I’d have had more time, I would have allowed the children to hold the iron and do the job themselves under close supervision.
I was concerned that current draw would be excessive without a current limiting resistor, but I measured only 5mA of current even with both LEDs in parallel. Given the added complexity of adding a current limiting resistor, I left it out. Inserting a 180ohm or 220ohm resistor might help extend the battery lifetime. With a 40 hour or so lifetime already, children will get plenty of use out of it provided they don’t leave it on overnight.
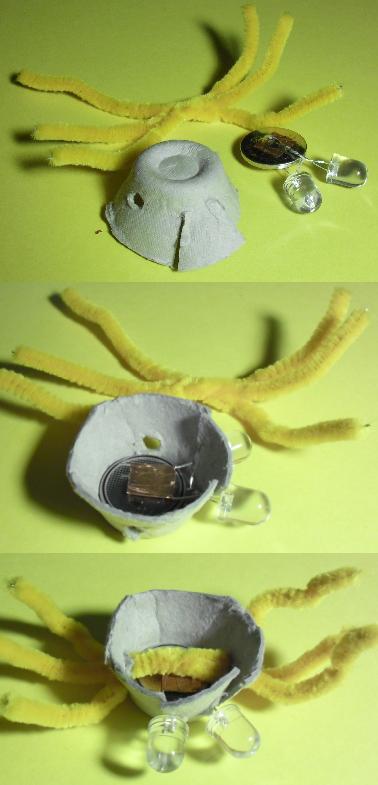
Once the electronic side is done, the rest is a straightforward craft project. Cut out a dome from the egg carton. Cut two slots spaced to accept the leads to the LEDs. and two holes to insert the pipe cleaner legs. Insert the coil cell and LED assembly with the switch side down. Cut three pipe cleaners (four for a “spider”) to serve as legs. Adjust the gap to ensure the the bug lights easily with pressure but doesn’t stay turned on when pressure is released.

Project completed! We ended up the evening at Dr. Osborn’s Mad Science Magic Show, a great time for children and adults alike.


4 thoughts on “LED Bugs: An Easy Craft Project for Children”
Thanks for sharing this project. I’d love to try it with my son and his friends. It seems pretty straightforward, but I’m not clear on how the “switch” works. How does one turn the lights on and off on the bug?
Thanks for your interest. The leads on the LED flex and bend on pressure. One pair of leads is firmly attached to the battery. The other pair of leads are wrapped in copper tape to make a pad. Bend the leads to make the copper tape pad touch the battery to close the switch and light the LEDs. Release pressure so that there is a gap between the copper tape pad and the battery and the switch is open so the lights are off. It does take a bit of bending and adjusting to get the action just right. I recommend doing it this way, because if you connect it to be always on, the battery will run down in a few days.
The critical part of the design is making sure the correct leads on the LED are attached to the correct side of the battery. If they are hooked up backwards, the LED won’t light, but it won’t hurt either the LED or the battery. Feel free to touch one lead to one side and one lead to the other to make sure the LED lights up and you have the right lead on the right side.
Let me know if you have any other questions.
Seems a bit of a stretch since almost all colored LED’s will burn out instantly on 3vdc. Whites normally take about 3v, but reds and greens about 2v. Rat Shack has some odd colored varieties that take 5v, but absolutely none in our store bins with anything like exactly 3v.
Also, depending on exactly which battery is in use, it can become very hot and burn little fingers.
Whoever tries to use these with kids would be well advised to do some experimenting first.
We had a successful track record using the parts specified with a couple dozen LED bugs built – no LED failures or over heating batteries. You should certainly try it out first particularly if substituting different parts. Adding a current limiting resistor as suggested might help if your design exhibits overheating or LED burn out. The biggest danger is in handling the soldering iron which really should only be done by an adult or under extremely close adult supervision. Little fingers sometimes get too curious and must be kept away from the iron as well as freshly soldered parts. Check that the solder has cooled before allowing children to handle their bugs, and make sure to use a lead-free solder.